> ## Documentation Index
> Fetch the complete documentation index at: https://latch.mintlify.site/llms.txt
> Use this file to discover all available pages before exploring further.
# Quickstart
> Get Latch running in 5 minutes with Docker Compose.
This guide gets you from zero to a working Latch setup protecting an MCP server.
## Prerequisites
* Docker and Docker Compose installed
* Node.js 18.4.0+ (for the CLI)
* An MCP client (Claude Desktop, Cursor, etc.) — or just test with the CLI
## Step 1: Start Latch
```bash theme={null}
git clone https://github.com/latchagent/latch
cd latch
docker compose up -d
```
This starts:
* **Latch server** on port 3000 (dashboard and API)
* **PostgreSQL** for data storage
Use `docker compose up` (without `-d`) to see logs in your terminal. Add `-d` to run in the background.
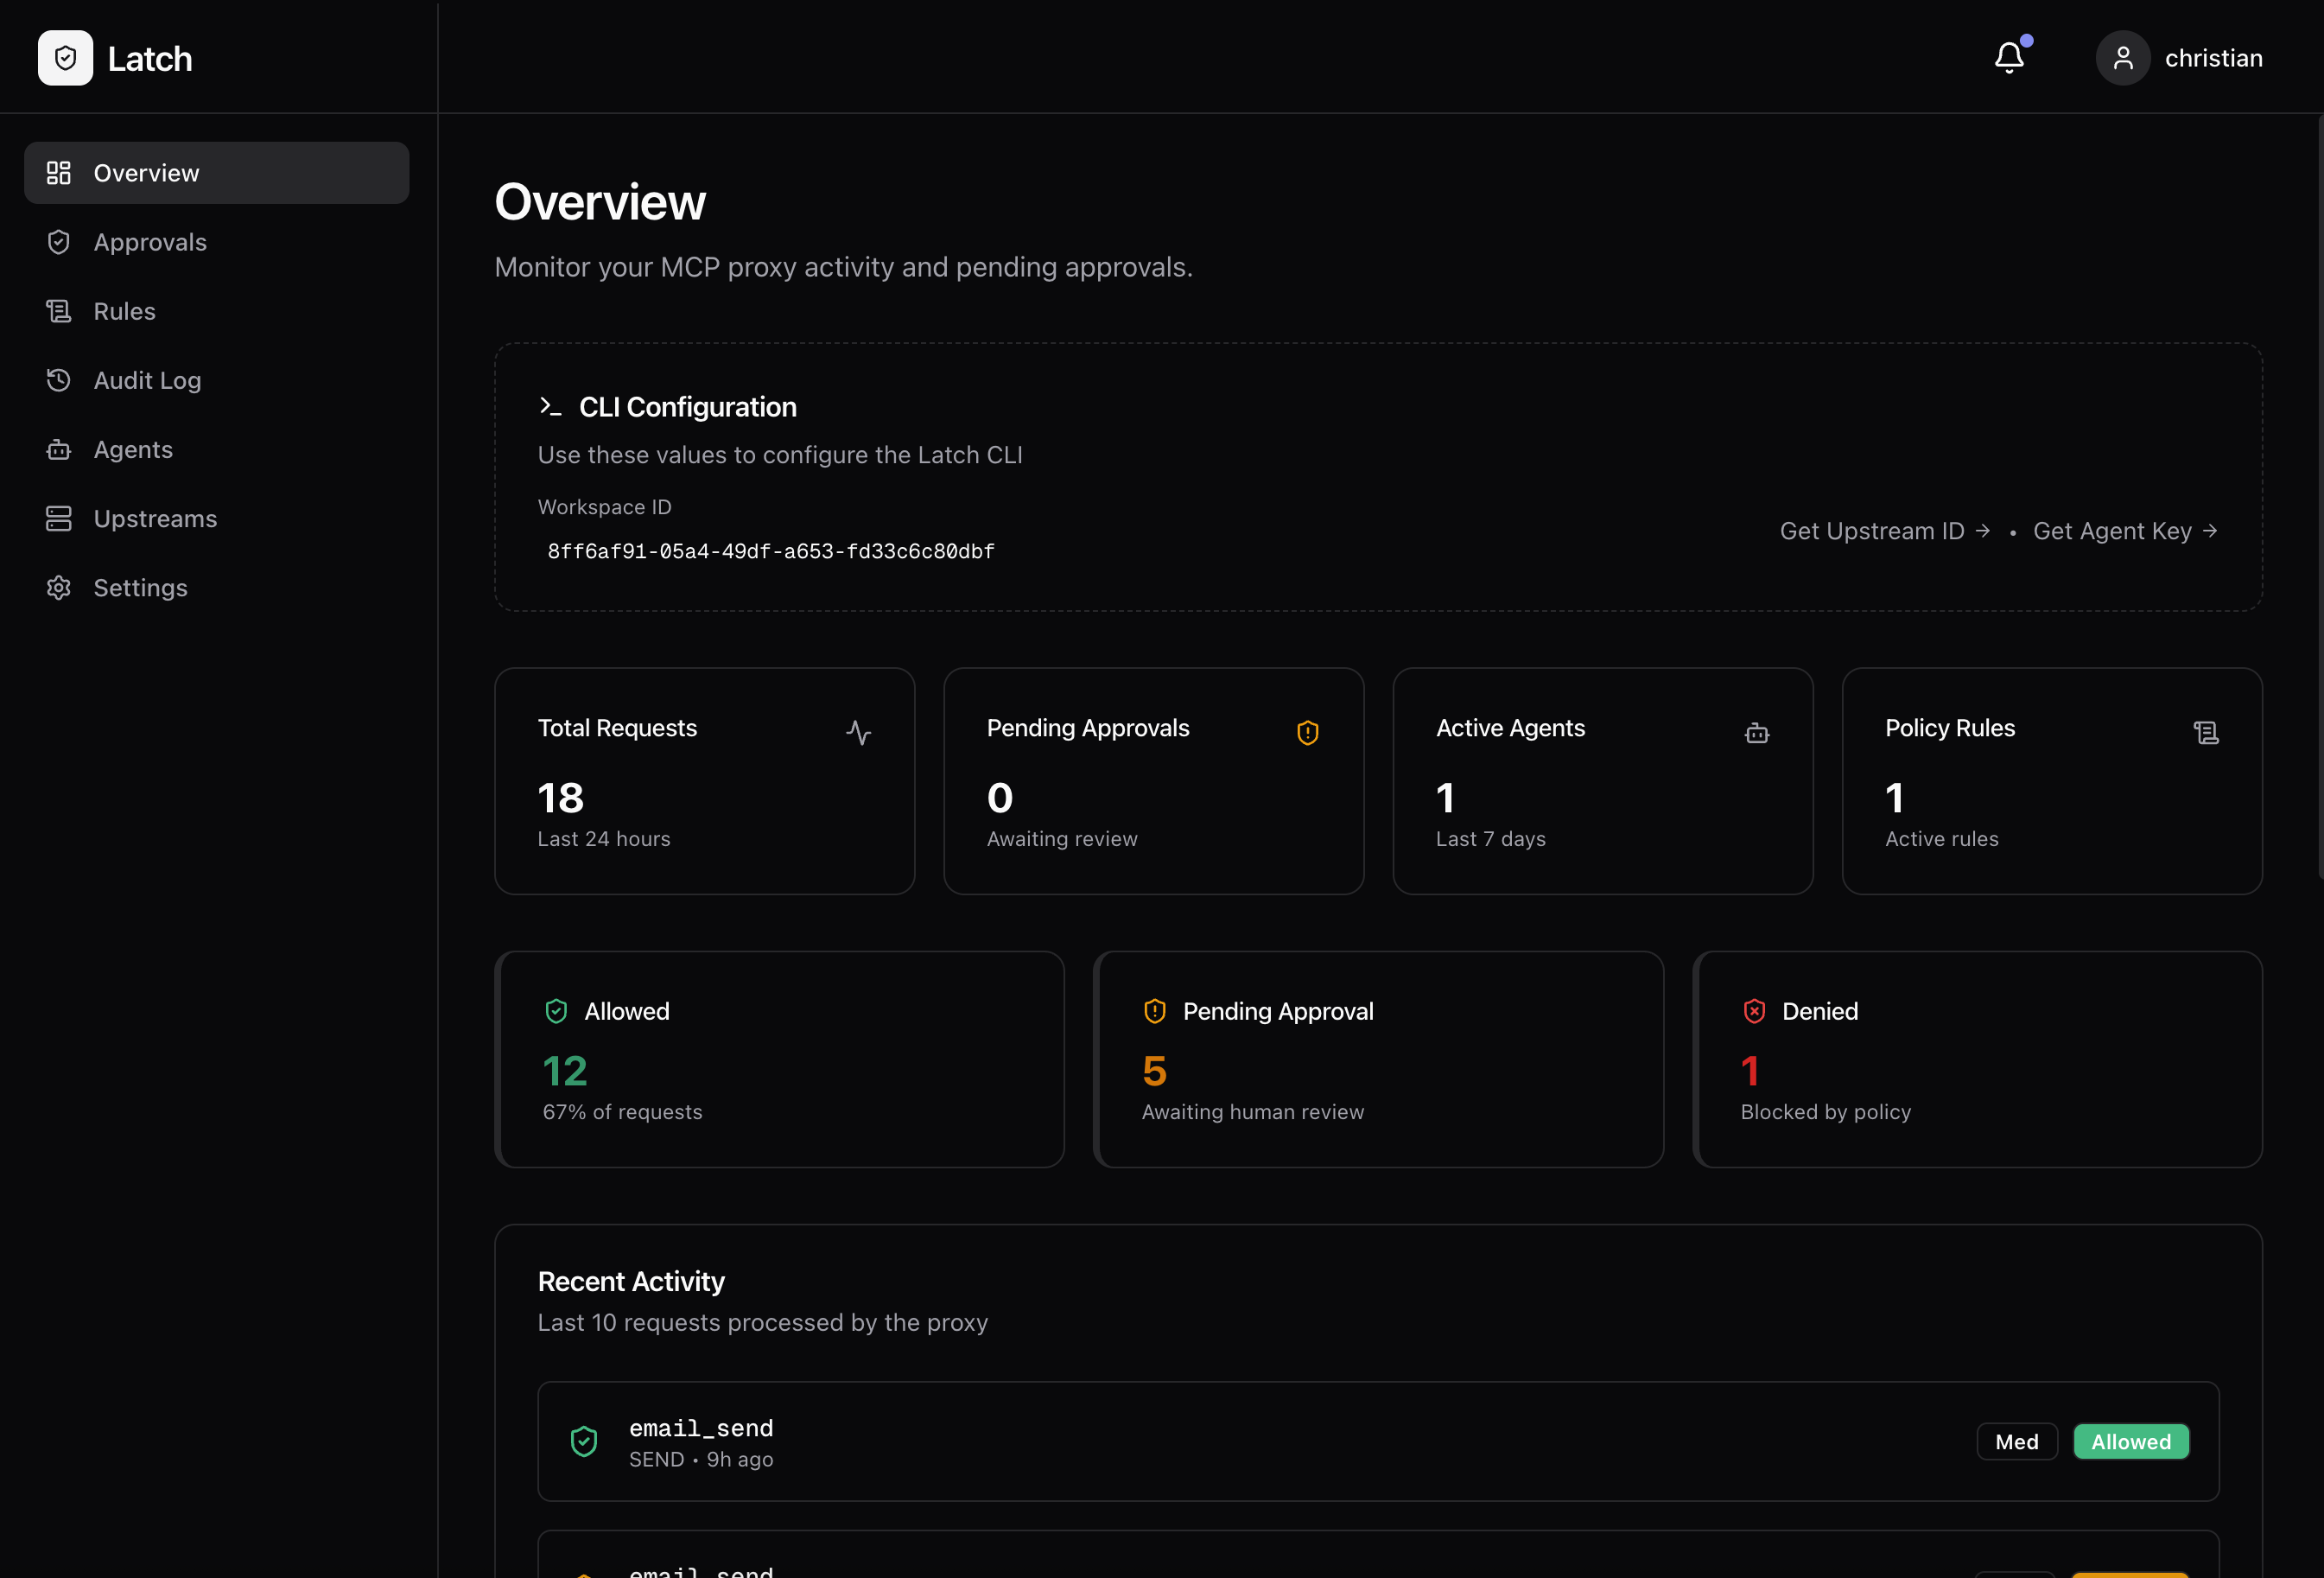
## Step 2: Create Your Account
1. Open [http://localhost:3000](http://localhost:3000)
2. Click **Register** and create an account
3. You'll be taken to your first workspace
 ## Step 3: Create an API Key
1. Go to **Settings** → **API Keys**
2. Click **Create API Key**
3. Give it a name (e.g., "local-dev")
4. Copy the key — you'll need it for the CLI
Keep your API key secret. Anyone with the key can route traffic through your Latch instance.
## Step 4: Create an Upstream
An upstream represents the MCP server you want to protect.
1. Go to **Upstreams** in the sidebar
2. Click **Create Upstream**
3. Choose **Stdio** (for local MCP servers)
4. Name it something descriptive (e.g., `filesystem`)
## Step 5: Sync Tools
Use the CLI to discover and register the tools from your MCP server:
```bash theme={null}
npx @latchagent/cli@latest tools-sync \
--api-key "latch_YOUR_KEY" \
--upstream "filesystem" \
--upstream-command "npx" \
--upstream-args "-y,@modelcontextprotocol/server-filesystem,/tmp"
```
Arguments in `--upstream-args` must be **comma-separated**, not space-separated.
Check the **Tools** page in the dashboard — you should see the discovered tools.
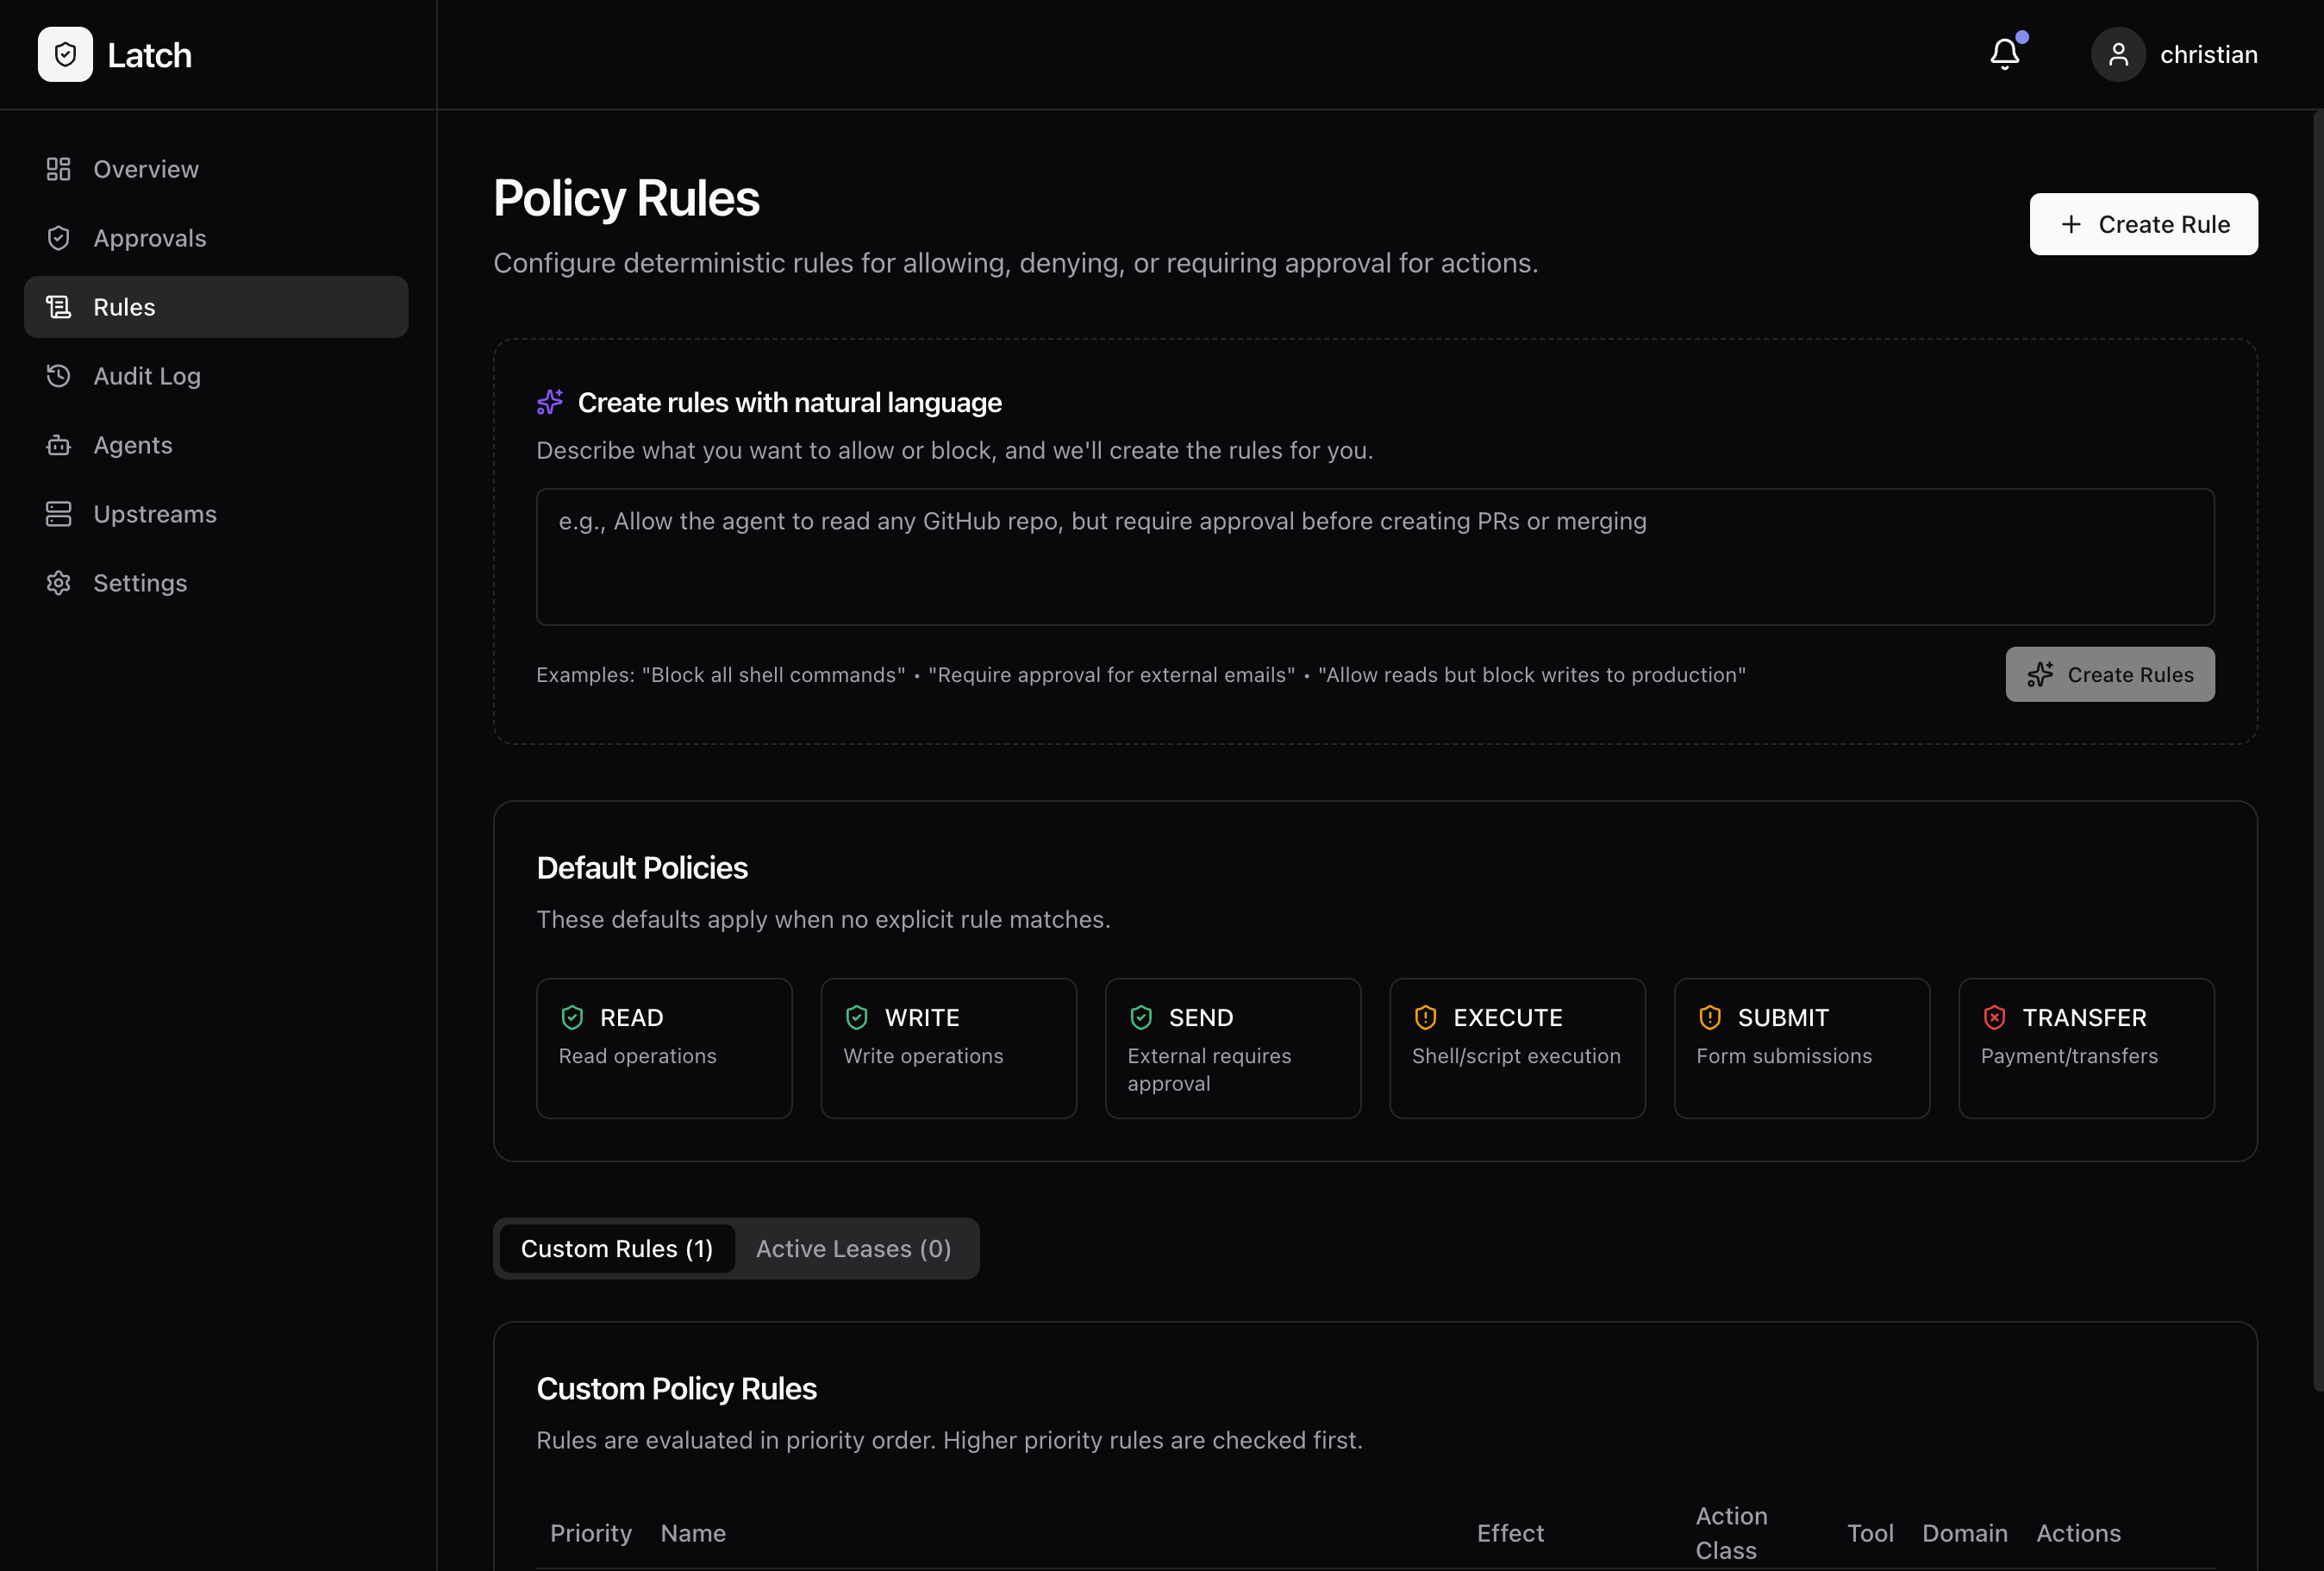
## Step 6: Create a Rule
Let's create a simple rule to require approval for file writes.
1. Go to **Rules** in the sidebar
2. Click **Create Rule**
3. Configure:
* **Name:** "Approve file writes"
* **Effect:** Require Approval
* **Action Class:** External Write
* **Upstream:** filesystem
4. Click **Save**
## Step 3: Create an API Key
1. Go to **Settings** → **API Keys**
2. Click **Create API Key**
3. Give it a name (e.g., "local-dev")
4. Copy the key — you'll need it for the CLI
Keep your API key secret. Anyone with the key can route traffic through your Latch instance.
## Step 4: Create an Upstream
An upstream represents the MCP server you want to protect.
1. Go to **Upstreams** in the sidebar
2. Click **Create Upstream**
3. Choose **Stdio** (for local MCP servers)
4. Name it something descriptive (e.g., `filesystem`)
## Step 5: Sync Tools
Use the CLI to discover and register the tools from your MCP server:
```bash theme={null}
npx @latchagent/cli@latest tools-sync \
--api-key "latch_YOUR_KEY" \
--upstream "filesystem" \
--upstream-command "npx" \
--upstream-args "-y,@modelcontextprotocol/server-filesystem,/tmp"
```
Arguments in `--upstream-args` must be **comma-separated**, not space-separated.
Check the **Tools** page in the dashboard — you should see the discovered tools.
## Step 6: Create a Rule
Let's create a simple rule to require approval for file writes.
1. Go to **Rules** in the sidebar
2. Click **Create Rule**
3. Configure:
* **Name:** "Approve file writes"
* **Effect:** Require Approval
* **Action Class:** External Write
* **Upstream:** filesystem
4. Click **Save**
 ## Step 7: Test It
Run an MCP server through Latch and try a write operation:
```bash theme={null}
npx @latchagent/cli@latest run \
--api-key "latch_YOUR_KEY" \
--upstream "filesystem" \
--upstream-command "npx" \
--upstream-args "-y,@modelcontextprotocol/server-filesystem,/tmp"
```
This wraps the filesystem MCP server. When a tool call comes in that triggers your rule, you'll see it in the dashboard.
### Testing with Claude Desktop
See the [Claude Desktop Setup](/claude-desktop) guide to configure Claude to use your protected MCP server.
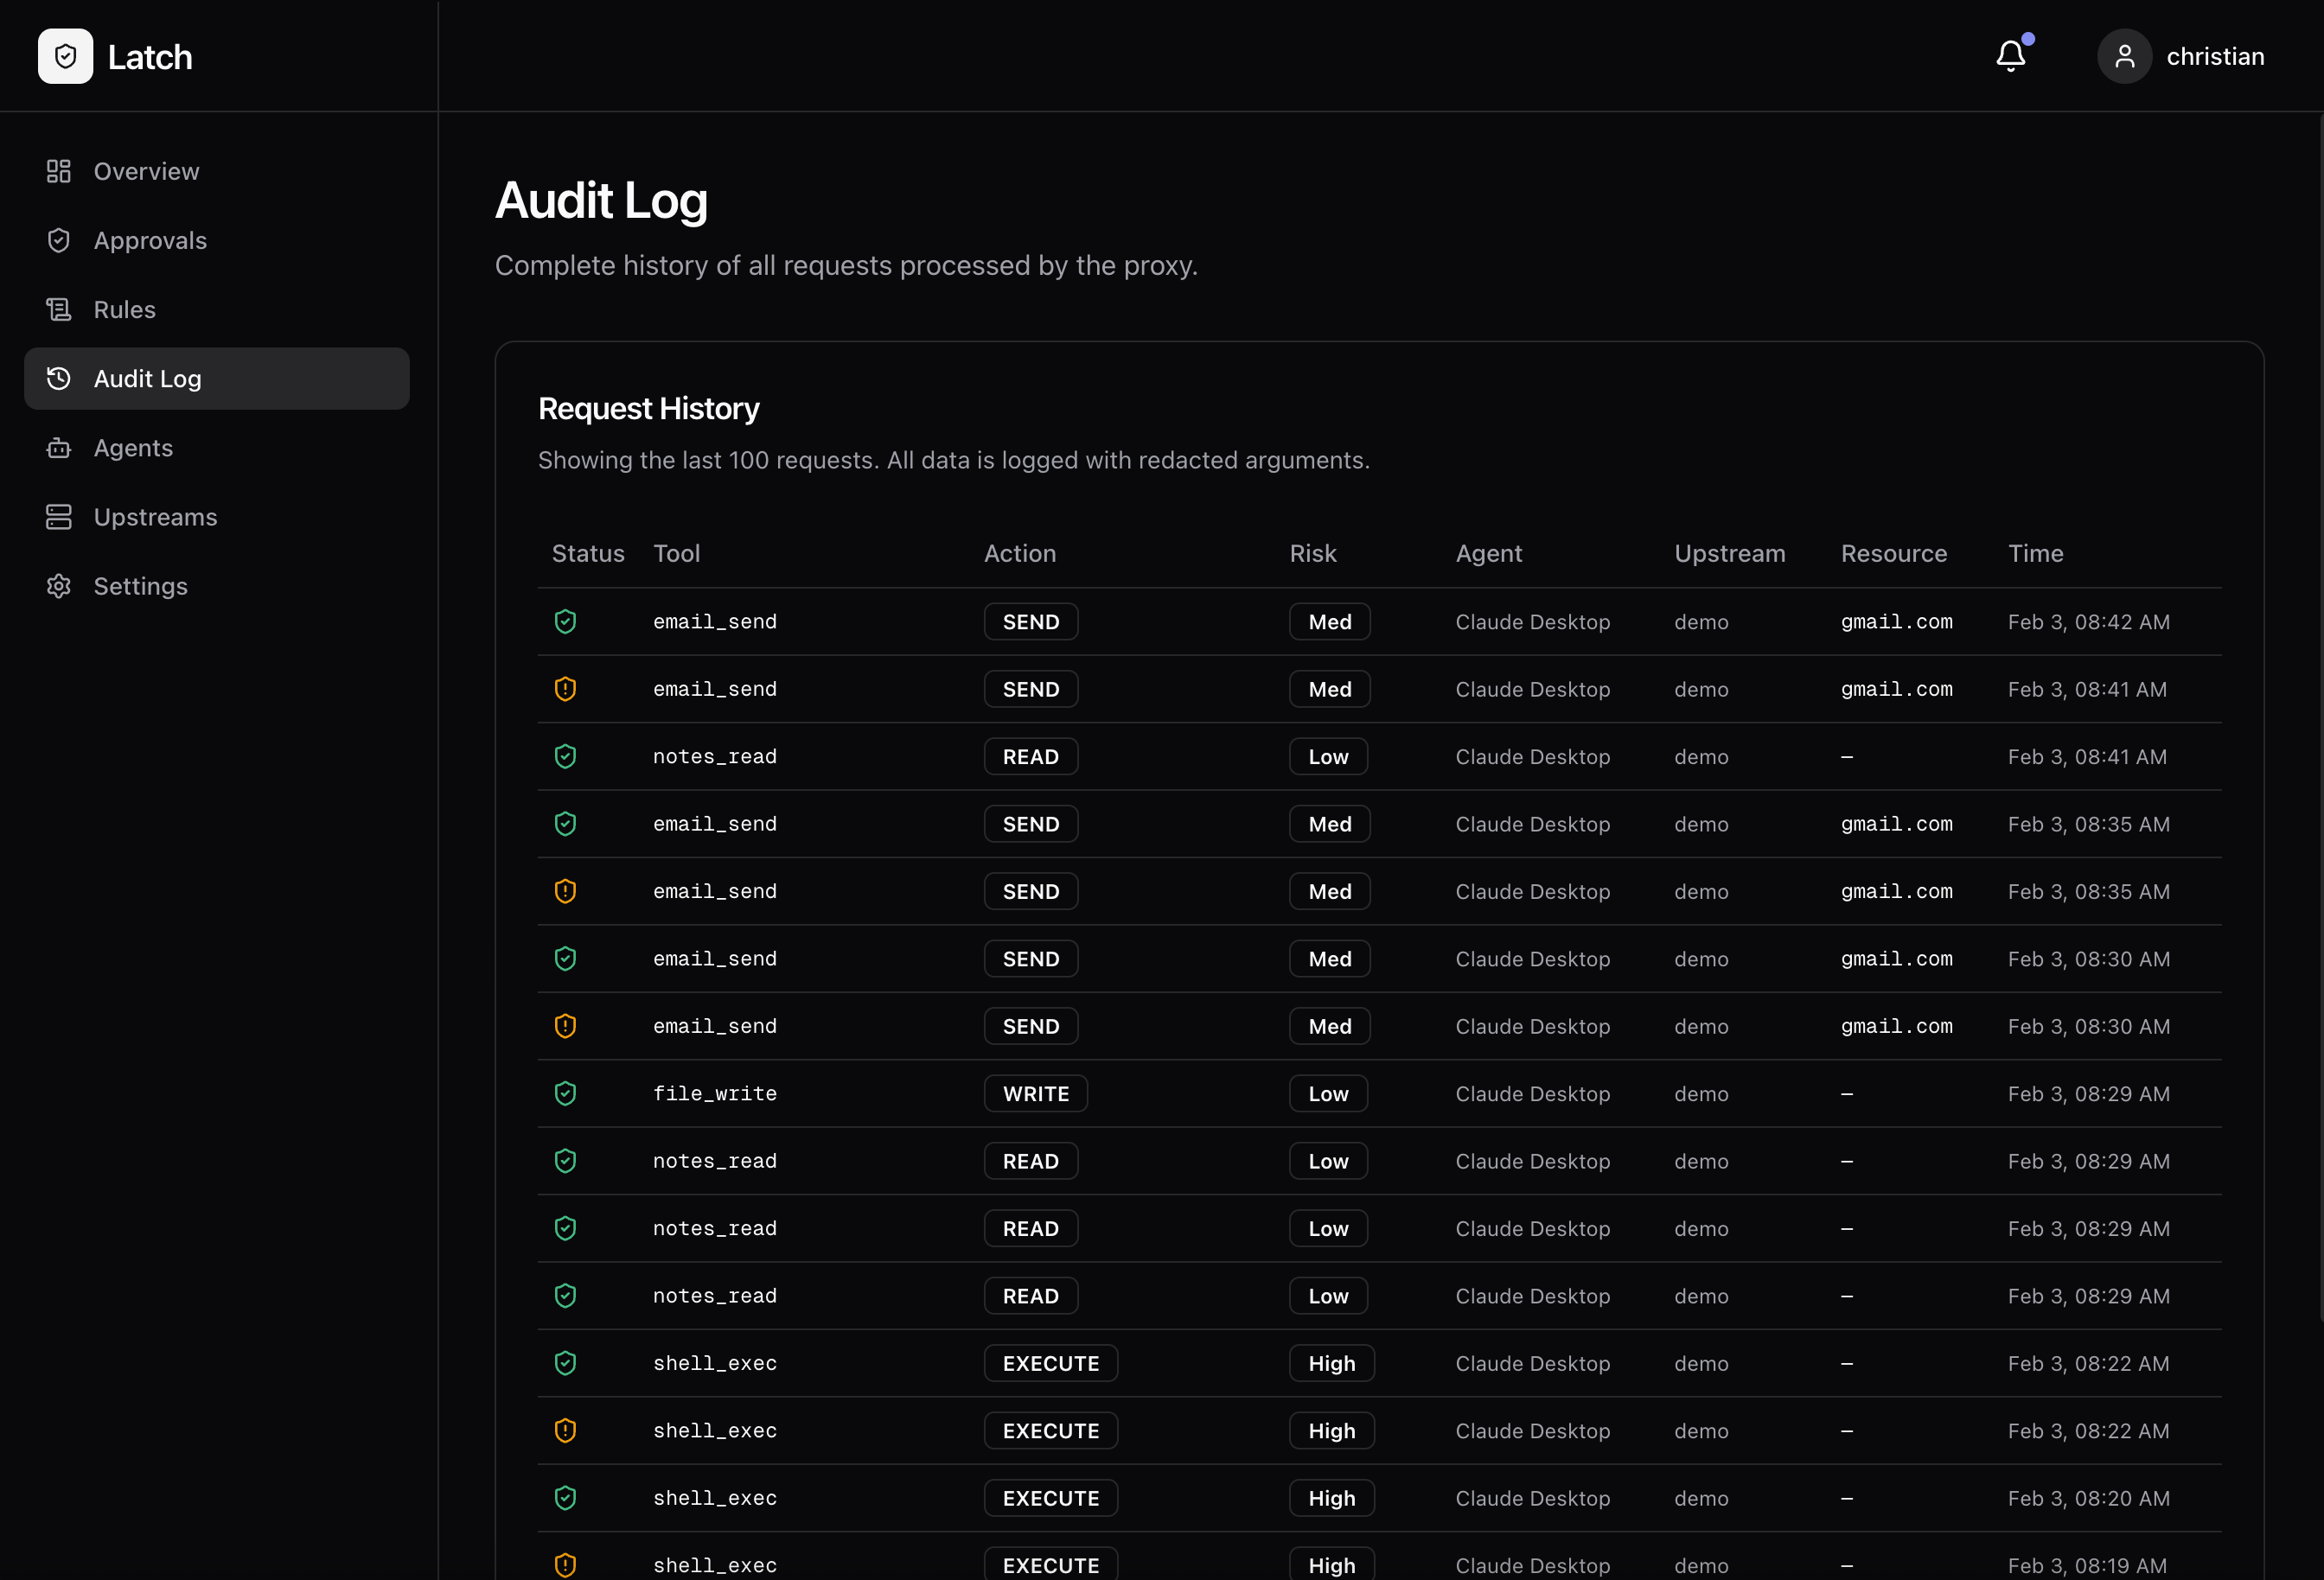
### Testing with the Dashboard
1. Go to **Audit Log** to see incoming requests
2. If a request requires approval, you'll see it highlighted
3. Click to approve or deny
## Step 7: Test It
Run an MCP server through Latch and try a write operation:
```bash theme={null}
npx @latchagent/cli@latest run \
--api-key "latch_YOUR_KEY" \
--upstream "filesystem" \
--upstream-command "npx" \
--upstream-args "-y,@modelcontextprotocol/server-filesystem,/tmp"
```
This wraps the filesystem MCP server. When a tool call comes in that triggers your rule, you'll see it in the dashboard.
### Testing with Claude Desktop
See the [Claude Desktop Setup](/claude-desktop) guide to configure Claude to use your protected MCP server.
### Testing with the Dashboard
1. Go to **Audit Log** to see incoming requests
2. If a request requires approval, you'll see it highlighted
3. Click to approve or deny
 ## What's Next?
Connect Claude Desktop to MCP servers through Latch
Define what actions are allowed, denied, or require approval
Get mobile alerts and approve requests on the go
Environment variables and advanced settings
## Troubleshooting
### Dashboard won't load
Check if containers are running:
```bash theme={null}
docker compose ps
```
View logs:
```bash theme={null}
docker compose logs latch
```
### CLI can't connect
Verify Latch is running:
```bash theme={null}
curl http://localhost:3000/health
```
### Tools not appearing
Make sure you ran `tools-sync` after creating the upstream. The sync command discovers available tools and registers them with Latch.
## What's Next?
Connect Claude Desktop to MCP servers through Latch
Define what actions are allowed, denied, or require approval
Get mobile alerts and approve requests on the go
Environment variables and advanced settings
## Troubleshooting
### Dashboard won't load
Check if containers are running:
```bash theme={null}
docker compose ps
```
View logs:
```bash theme={null}
docker compose logs latch
```
### CLI can't connect
Verify Latch is running:
```bash theme={null}
curl http://localhost:3000/health
```
### Tools not appearing
Make sure you ran `tools-sync` after creating the upstream. The sync command discovers available tools and registers them with Latch.